[Success][Guide]OpenCore Gigabyte Z490 Gaming X i7 10700 RX580 (Ventura)
Updated March 2023: This is a completely updated/revised version of a guide I wrote in July 2020.

The Gigabyte Z490 Gaming X motherboard can easily be made to run macOS. This was a very simple build, minimal in hardware and easy to set up. As I am on a LAN line, I do not use (nor will I cover) Wifi and Bluetooth neither of which come with the motherboard but you can easily purchase an add-on card solution if needed.
Hardware: (as of March 2023)
Gigabyte Z490 Gaming X (ATX)
Intel i7 10700
NZXT Kraken X53 AIO CPU Cooler
16GB G.Skill Ripjaws V DDR4-3600 PC4-28800 CL16
Western Digital Black SN770 500GB NVMe (recommended for macOS Monterey and newer)
Sapphire Pulse RX580
Corsair TX650W PSU (from a previous build)
NZXT H510 Case
GIM PSU Extension Cables (Black)
PCIe NVMe Adapter Card (for 3rd NVMe drive)
Working:
Ethernet
Audio (AppleALC)
Sleep / Wake
Not Working:
iGPU (I do not use this nor have I tried to make this work)
DISCLAIMER: The files I provide are specific to the hardware listed above. The Sapphire Pulse RX580 is a graphics card (GPU) recommended by Apple and natively supported in macOS Catalina and newer. If you choose a different GPU and/or motherboard variant, you may have to do your own research as to how to make them work properly. My EFI folder should work for variants of the Gigabyte Z490 Gaming X (with exception of the port mapped kext used). Please note, I do not cover Windows OS. If creating the install media on Windows, please search for a guide elsewhere to do so. Then continue here.
For my latest EFI files, download links are posted on the resources page. For notes on these releases, please refer to posts on the home page.
Included In My EFI Files:
- OpenCanopy (boot loader GUI, no audio).
- CrScreenshotDxe.efi (driver) allows for screen grab in the boot loader (press F10). Screen grabs are saved to the EFI partition.
- SMCProcessor.kext and SMCSuperIO.kext which allow for various hardware monitoring. I use iStatMenu app (paid app), alternately HWMonitor (free app).
- ToggleSipEntry.efi driver which allows one to disable or enable SIP directly from the boot screen rather than having to boot into Recovery.
What You Will Need:
- 16GB Thumb Drive.
- macOS Ventura, Monterey or Big Sur Installer App. For Catalina click here
- My latest EFI Folder Download.
- Hackintool – https://github.com/headkaze/Hackintool/releases – a multi tool “Swiss Army Knife” for macOS.
- GenSMBIOS – https://github.com/corpnewt/GenSMBIOS – a script for generating SMBIOS information.
- ProperTree – https://github.com/corpnewt/ProperTree for editing OpenCore config.plist file (you may need to instal Python). Alternatively, you can just use TextEdit.
Creating The Installer:
- Make sure the Ventura, Monterey or Big Sur Installer App is in your applications folder.
- Format your thumb drive using DiskUtility. Name it “MyVolume” and format the thumb drive to Mac OS Extended Journaled, GUID partition.
- For Ventura run the following Apple command in the terminal app to create the install media. Code: sudo /Applications/Install\ macOS\ Ventura.app/Contents/Resources/createinstallmedia -volume /Volumes/MyVolume
- For Monterey run the following Apple command in the terminal app to create the install media. Code: sudo /Applications/Install\ macOS\ Monterey.app/Contents/Resources/createinstallmedia –volume /Volumes/MyVolume
- For Big Sur run the following Apple command in the terminal app to create the install media. Code: sudo /Applications/Install\ macOS\ Big\ Sur.app/Contents/Resources/createinstallmedia –volume /Volumes/MyVolume
- Wait for this to complete before moving forward.
Which SMBIOS Should I use?
- Install and run macOS Ventura, Monterey or Big Sur: Use iMac20,1
- Intel Core i9 10900 CPU: Use iMac20,2 (Recommended by OpenCore Guide).
Open the GenSMBIOS folder and double-click the GenSMBIOS.command. It will run in the Terminal App. Follow the steps below.

- On the first screen, type 3 to choose “Generate SMBIOS” from the menu and hit enter.
- Then type your model and the number of SMBIOS sets to generate… for example iMac20,1 3 (I like to get at least 3 results in case one is not working). Hit enter.
- You should see 3 sets of SMBIOS information. Keep this terminal window open for now as we need to copy from it in the next section.
- Check the SN to make sure it is not already being used… Go to: https://checkcoverage.apple.com
- Input the SN (from your chosen SMBIOS set) on that page and if you get a message that says “We’re sorry, but this serial number isn’t valid…” then that means that SN is not registered and you can use it.
Add the SMBIOS Info to the Config File:
- Unzip the EFI folder I provided. Open the folder and go to the EFI/OC directory.
- Open the config.plist file with the ProperTree app (or TextEdit).
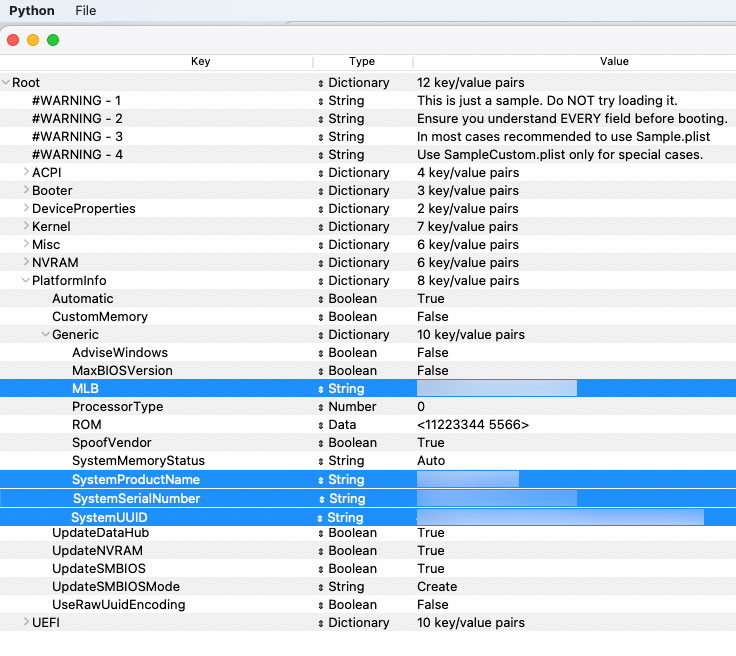
- Go to the Platforminfo section (TextEdit do a find for platforminfo). Fill in/replace the SMBIOS information with your own that you generated above. You will need the MLB, SystemProductName (iMac20,1), SystemSerialNumber, SystemUUID.
- Then Save the file.
Now will make the installer thumb drive bootable by coping the EFI folder to it’s EFI partion:
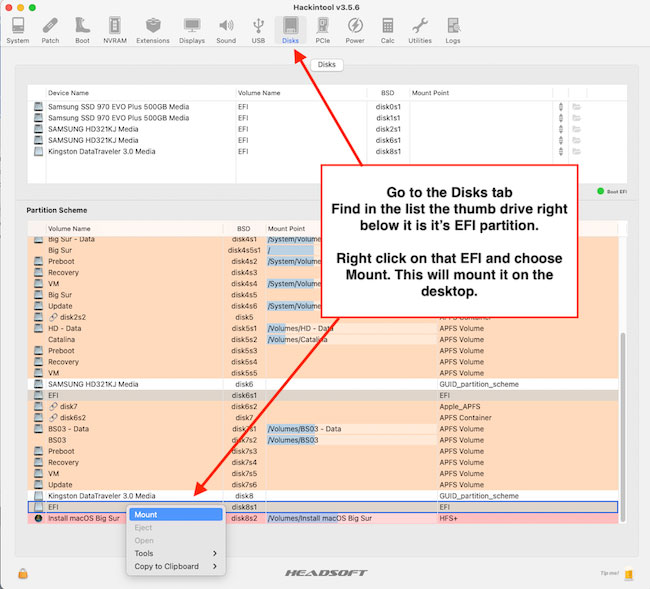
- Launch the Hackintool app and click the “Disks” tab.
- Find your thumb drive in the list and right click on the EFI partition directly underneath it.
- Select “Mount” and provide your admin password.
- The thumb drive’s EFI partition will show up on your desktop.
- Now copy the EFI folder to the thumb drives EFI partition.
That is all for the installer part. Now lets setup the BIOS.
BIOS Settings (version F20):
For Gigabyte motherboards, start the computer and on boot screen press the DELETE key to enter the bios. You can toggle simple and advanced by pressing the F2 key. We need advanced.
Go to Save & Exit and select Load Optimized Defaults
Go to Favorites:
- Set Extreme Memory Profile (X.M.P) – Profile 1
- CSM Support – Disabled (default)
- VT-d – Disabled
Got to Settings – IO Ports:
- Internal Graphics – Disabled
- Above 4G Decoding – Enabled
Go to Settings – IO Ports – USB Config:
- XHCI Hand-Off – Enabled (default)
Go to Boot – Windows 10 Features – Other OS
Go to Boot – CSM Support – Disabled
Save & Exit
Installing Mac OS X:
You should now be able to boot from the installer thumb drive. Start your computer and tap the F12 key when the Gigabyte logo appears. This will bring up the boot menu. Choose your thumb drive to boot from and then you will see the OpenCore boot loader screen. Select “Install Mac OS X Ventura (Monterey or Big Sur). Once the installer comes up, you will need to format your internal drive… Use Disk Utility and format the internal drive to APFS/GUID. Then start the installation… it will run and there will be restarts during the installation process.
Boot your installed OS:
After installation is done, boot again from the thumb drive and in the OpenCore boot loader screen this time choose your internal HD (Ventura, Monterey or Big Sur), when you boot you will get the usual black screen with the Apple logo and loading bar… then you may get a black screen no logo (don’t panic) give it a moment and you will see the logo again or it will just get right into the finish setup screen. Complete the setup process and then move on to the next section.
Post Install:
At this point you need to setup a few things:
- Go System Preferences (Settings in Ventura) > Sound and set Output to Internal Speakers which is the GREEN output from the rear IO of the computer.
- Go to System Preferences (Settings in Ventura) and set the Startup Disk to your internal drive. This will default the selection in the list when OpenCore boots so you don’t have to choose it every time.
- Now you need to place a copy of the EFI folder on the internal drive to boot from it… Use the Hackintool app to mount your internal drive’s EFI partition and then mount your installer thumb drive EFI partition.
- Copy the EFI folder from the thumb drive EFI partition to the internal drive’s EFI partition.
- Restart and it will boot from the internal drive.
That is all… Enjoy!
Extra things you should know about…
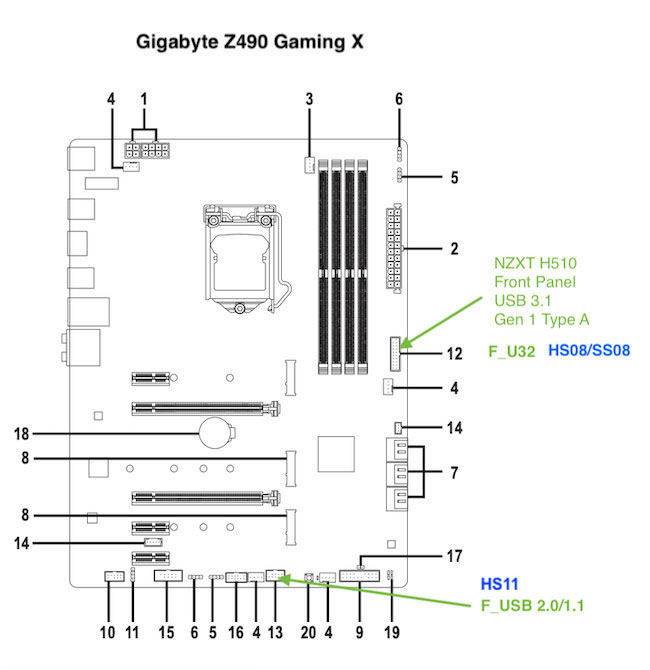
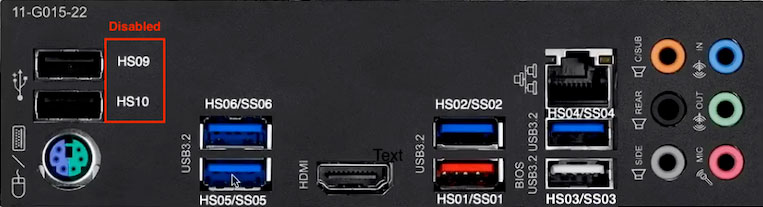
Notes on USB Port Mapping: To keep the guide short I have made what I consider the best option for USB port mapping. To meet the limitation (15), I have disabled the rear two USB 2.0 ports in favor of keeping all the 3.x ports as well as the two internal port headers on the motherboard usable.
The Gigabyte Z490 Gaming X motherboard has the following USB ports:
- On the Motherboard: One 3.1 Gen Type A header and One 2.0/1.1 header (these are configured usable). The 2.0 for an AIO or other use and the 3.0 for the front/top panel port on the computer case).
- On the back panel (IO): Two USB 2.0 and Six USB 3.2 ports (the two USB 2.0 ports are disabled).
NOTE: the port limitation in Mac OS X is 15. Remember when adding them up, USB 2.x ports count as 1 and USB 3.x count as 2 each. I used Hackintool to identify and create my USBPorts.kext. The images below shows all the ports and are tagged appropriately for the Gigabyte Z490 Gaming X (ATX) motherboard should you choose to re-do USB port mapping.
Performance:
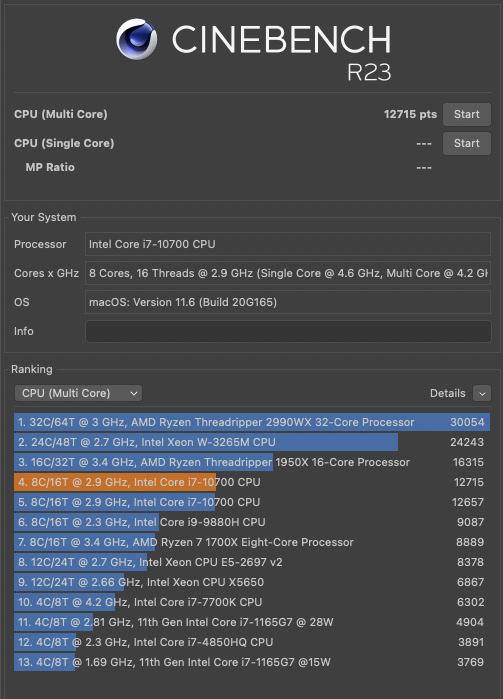
I am a complete novice on testing but here are some initial results with Geekbench and Cinebench (From August 2020).


You must be logged in to post a comment.