
Automating tasks using Automator, AppleScript and Quick Actions
In this third article in the series, we will look at automating moving files by using Automator and creating a Quick Action.
You can cut and paste files in macOS but in the Finder under the Edit menu, “Cut” (command + x) is grayed out. You have to use “Copy,” then navigate to the destination. After that you need to hold down the Option key to get the “Move” option (or use command + Option + v). This is how the macOS Finder does cut and paste with files.

Then there are applications that let one setup drop locations and will move (or copy) your files to those locations usually with drag and drop. However, most of them are always running in the background and using up ram.
Moving files can be automated and there are a couple of ways this can be done:
-
You can create a “Folder Action.” With a folder action, anything you drag into that folder immediately triggers the process.
-
An Automator Application. Like a drag and drop app.
-
A Quick Action
There is one caveat. You need to give a destination. If it is always the same location, the process is fully automated as you can jus select the files and go. But we need to move files to different locations.
Below we will build a Quick Action that will put moving files a mouse click away. We will use a prompt for file destination and also add some AppleScript to display a notification when the task has been completed.
The Mover
Let’s get started…
Go to your Applications folder, then the Utilities folder and launch the Automator app. When the Automator app runs, you will not see a window until you select from its menu File>New. Then you will get the following…

Select Quick Action as seen above and click choose.
On the far left, you will see the Library (categories) and just to the right of that what is contained in those categories. Do the following…
-
Select from the far library “Files & Folders”. Click, hold and drag the “Move Finder Items” action into the large gray workflow area (see below).
-
In the move finder items action, click “Options” and tick the box for “Show this action when the workflow runs”.
-
Now at the very top change the default “Workflow receives current” to Files & Folders. And “in” Finder.

Now will add a little notification that will show up after the files have been moved. We can do this with AppleScript.
At the left of the Automator window, make sure Library is selected. Then at the top of the Automator window there is a search field will use to quickly get us what we need. Type “run” into the search field. No need to press enter, it should come up with a short list and including an item called “Run AppleScript.” Click, hold and drag the Run AppleScript into the gray workflow area just below our Move Finder Items action.

You will notice there is a place holder script. Delete it, and copy then paste the following script in its place.
on run
display notification "Files have been moved" with title "Mover" subtitle "Processing is complete."
delay 1
end run
After pasting in the script, click the little “Hammer” button to properly auto format it.
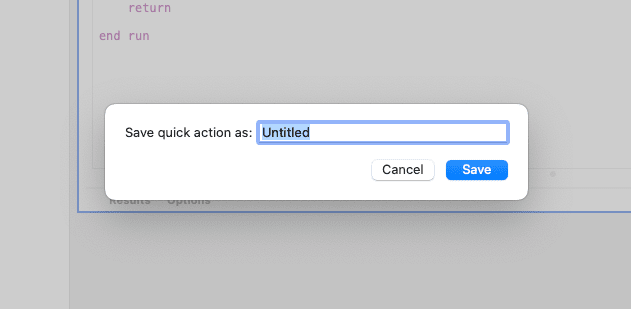
This script just displays a notification after the task is done. The message can be customized by changing the text between the quotes. Notice I have named the title “Mover” as that is the name of the Quick Action I created. I have also set the delay to 1. This is the minimum time for the notification to display.
Finally, your workflow should look like this…

User/Library/Services
Before this Quick Action can be available for use, it needs to be enabled. Go to your System Preferences (System Settings in macOS Ventura). Click Extensions, select the “Finder” from the list and then tick the box for your “Mover” action.

Let’s test it out…
In the Finder, select a file or files you would like to move (not copy), and right-click… then choose Quick Action>Mover.

Since we used the Option “Show this action when the workflow runs”, you will be presented with a dialog for your files destination.

Click and choose from the “To” drop down and navigate to where you would like to move the files. Choose “Other…” If not from the list.

Once you have the destination, click the continue button and the files get moved and a notification will be displayed.

Next time… unlike other browser, Safari doesn’t have it.
