Automating tasks using Automator, AppleScript and Quick Actions

There are a handful of little things I need done in the macOS Finder on a frequent basis. Sure they can all be done through other apps, Finder menus, the Terminal etc., but why not have them all handy and just a click away. This is a short series of basic AppleScript write-ups that I will be doing… they have helped me greatly in my day-to-day use of macOS and I hope you to find them handy.
For the first article will look at automating something that is minor but very annoying (IMO) that the macOS Finder and Apple programs do for whatever reason. When you create a document, image or anything and save it, the Finder hides the extension of that file by default. While I know there is a Finder Preference that can be set to reveal extensions, it is global. Meaning that it will show every extension of anything on your Mac. This is annoying when it comes to the applications folder, but needed and important for other files. Also, one could take the “Get Info” route to un-tick “Hide Extension”. This however becomes tedious and takes too much effort (alternately so does changing flags via the Terminal all).
The solution is to create a Quick Action…
What is a Quick Action?
A Quick Action is a workflow (script that does something) that is saved to the User(Home)/Library/Services folder. And so it is a Service which is available via contextual menu in the Finder. This makes accessing your scripts (or tasks if you will) with just a right-click, making it much more convenient. Quick Actions are created using Apple’s Automator app. Quick Actions can be made up of many things, but mostly AppleScript and Terminal commands. Today will look at an easy one…
The Quick Action Unhide Extension will work with one or multi-selected files. You simply select the file/s and right click and choose Quick Actions>Unhide Extension. The script will run and in seconds all the selected files will show their extensions.
Let’s get started…
Go to your Applications folder, Utilities folder and launch the Automator app. When the Automator app runs, you will not see a window until you select from its menu File>New. Then you will get the following…

Select Quick Action as seen above and click choose.
Now let’s just go over the Automator workspace for a bit. On the far left, you will see the Library (categories) and just to the right of that what is contained in those categories. At the left of the Automator window, make sure Library is selected. Then at the top of the Automator window there is a search field will use to quickly get us what we need. Type “run” into the search field. No need to press enter, it should come up with a short list and the top item should be “Run AppleScript”.

files and folders and “in” drop-down Finder

In the AppleScript action box, it contains a basic script place holder. Delete it and copy then paste in the following script:
on run {input, parameters}
tell application "Finder"
repeat with anItem in input
if kind of anItem is "Folder" then
set theFiles to (every file in entire contents of folder anItem)
repeat with afile in theFiles
set extension hidden of afile to false
end repeat
else
set extension hidden of anItem to false
end if
end repeat
end tell
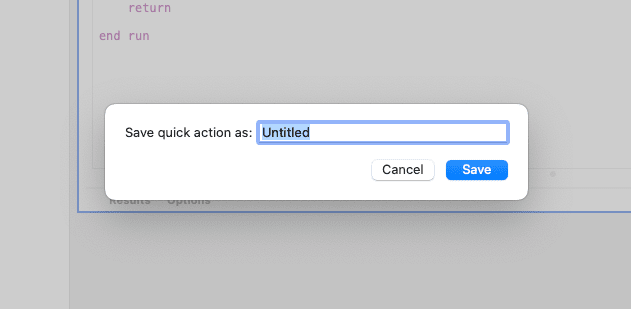
return
end run
After pasting in the script, click the little “Hammer” button to properly auto format it.
If you read through the script, it’s very simple… Tell the Finder to set the selected file or files hidden attribute to False. Thus making it visible (note if you want to hide the extension, you can just duplicate the script and change false to true).
User/Library/Services folder).
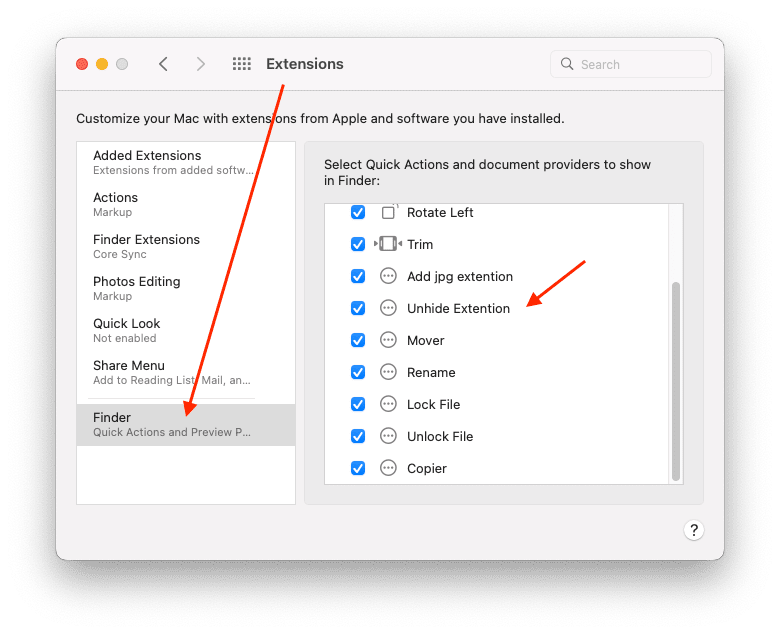
Before this Quick Action can be available for use, it needs to be enabled. Go to your System Preferences (System Settings in macOS Ventura). Click Extensions, select the Finder from the list and then tick the box for your Unhide Extension action.
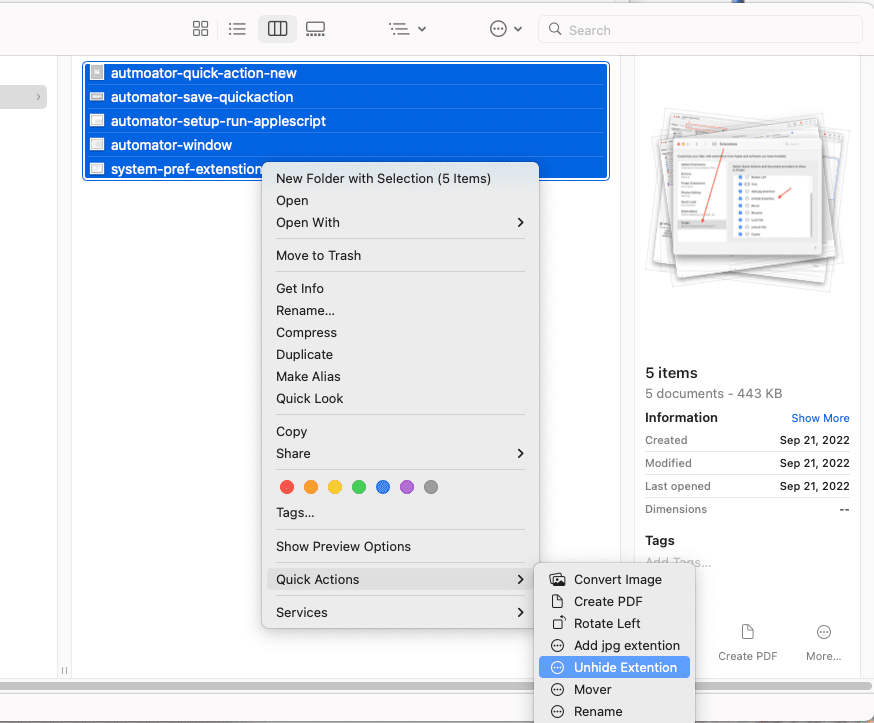
That’s all there is to it. Now let’s test it out. Drag and select a few files in the finder and right-click. Go down to “Quick Actions” and select “Unhide Extension”.
The result is in seconds…
Next time will tackle Lock and UnLock. See you then.
